User Guide – International version
(iOS v3.27, Android v3.27)
NOTE: For CERT and US Domestic versions,
all features are same minus the four forms.

1.Mobile App
1.1.Signing Up
- To create an account, enter first name, last name, email, password, and optional Team Code (up to 6 alphanumeric characters). All users who wish to coordinate as part of the same team (and be visible to their account Team Admin or Ops Coordinator) must use the same team code.
- To approve a new team member, the Team Admin or Ops Coordinator for the team will receive an email notice to approve or decline a user attempting to join their team. The Team Admin must log into their account at https://www.disastersurveyor.com/login/ and approve or decline the requested user. Both on the home page after logging in, and in the ‘Account’ section of the website will appear a red notice with name, email and links to click for ‘approve’ or ‘decline’ (figure 3).
- Upon creating an account, the top header of the home screen will display “Pending” following the requested Team Code, if the user has not yet been approved to join the team (figure 1). Upon approval, the top header will turn blue without the words “Pending” (figure 2).
- If the user has not signed up with a Team Code, the top bar on the home screen will display “Disaster Surveyor” instead of a Team Code. A welcome email is also sent to all users who sign up.
- To change your team code, tap the “Team ID” bar at the top of the home screen to go to the Team Code screen. Here, the user can change their Team Code, and a new approval request will be sent to that Team Code’s Team Admin.
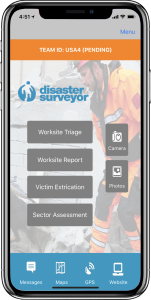 Figure 1. Home screen of Disaster Surveyor International version, showing pending approval at top. |
 Figure 2. Home screen of Disaster Surveyor International version, showing approved team code. |
 Figure 3. New team member approval and decline. |
|
1.2.Logging in
- To log into the app, enter email and password for your account to log in. If the account is associated with a Team Code, the app checks if that user has been approved, and if approved, simply shows “Team Code: xxx” at the home screen top bar, where ‘xxx’ is the Team Code (figure 2). If the user has a Team Code associated, but has not been approved, the top bar displays ‘Pending’ and the top bar color turns orange (figure 1). If the user does not belong to any Team Code, the top bar simply displays “Disaster Surveyor”.
1.3.Home Screen
- To change your Team Code, tap the top bar of the home screen displayed as either “Disaster Surveyor” or “Team Code: xxx” to enter the Team Code update screen (figure 4).
- To go to Settings, Team Code or Guidelines, tap the “menu” link on the upper right to go to the INSARAG Guidelines, App Settings, Team Code, and logging out (figure 5).
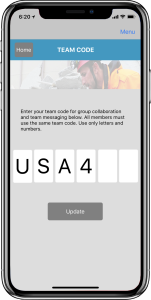 Figure 4. Team code screen. |
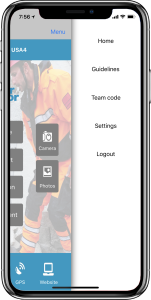 Figure 5. Side Menu |
1.4.Worksite Triage Forms
- To access the Worksite Triage forms, tap the “Worksite Triage” button on the home screen.
- To start a new Worksite Triage form, tap the “New Form” button on the Worksite Triage home screen (figure 6). This will start a fresh Worksite Triage form (figure 7).
- To save and close a Triage form, tap “Home” or “Close”. If “Close” is tapped, the form is closed, and the user is returned back to the list of saved Triage forms (figure 6). If “Home” is tapped, the user returns back to the app home screen, and upon tapping “Worksite Triage”, is returned back to the currently opened Triage form (figure 7). If minimum mandatory information for the form has not been entered and “Close” is tapped, the fields will highlight in red.
To upload Triage forms to the server (for Team Admins and Ops Coordinators), check the checkbox with the green checkmark for the items you wish to upload and tap “Upload” (figure 6). - To delete an existing Triage form, tap the trash can icon next to the Triage form (figure 6).
- To add photos to a Triage form, from the Triage form screen, tap “Camera” or “Photos” then “Camera” to take a photo and associate to the form (figure 8). If a photo has been saved for a Triage form, a small preview of the photo is displayed on the list of saved Triage forms on the device (figure 6).
- To delete a photo, tap the trash can icon for the photo in the “Photos” screen for that Triage form (figure 8). To see a larger version of the photo, tap the preview icon, and tap again to close.
- To generate a Search Marking for the Worksite Triage form, tap the “Marking” menu on the Triage form screen. The Worksite ID, any Hazards, team ID, Date, and Triage Category Letter from the Triage form are used for the marking (figure 9).
- To share a Triage form to another user via a web link (URL), tap the “Share” menu option on the Triage form, then select your desired method to share the form (figure 10). If the recipient opens the link without the app installed on their device, or on a desktop/laptop email client, the link will open an INSARG pdf form with the Triage Form and any saved Photos.
- To view the pdf INSARAG guidelines for Triage forms, tap the “Guidance” menu link in the Triage Form screen (figure 11).
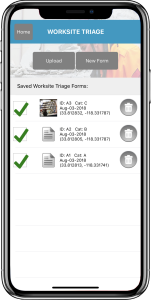 Figure 6. Worksite Triage home. |
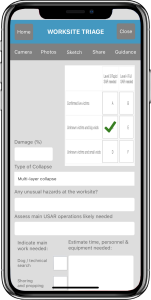 Figure 7. Worksite Triage form |
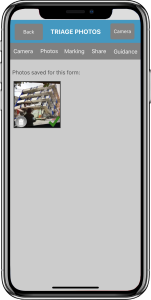 Figure 8. Triage form photos |
 Figure 9. Search marking |
 Figure 10. Share options |
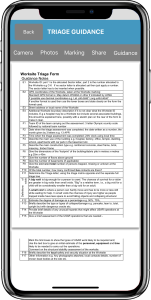 Figure 11. INSARAG guidelines |
1.5.Worksite Report Forms
- To access the Worksite Report forms, tap the “Worksite Report” button on the home screen.
- To start a new Worksite Report form, tap the “New Form” button on the Worksite Report home screen (figure 12). This will start a fresh Worksite Report form (figure 13).
- To save and close a Report form, tap “Home” or “Close”. If the minimum mandatory information for the form has not been entered, the fields will highlight in red. If “Close” is tapped, the form is closed, and the user is returned back to the list of saved Report forms (figure 12). If ‘Home” is tapped, the user returns back to the app home screen. Upon upon tapping “Worksite Report” again, the user is returned back to the currently opened Report form (figure 13).
- To upload Report forms to the server (for Team Admins and Ops Coordinators), check the checkbox with a green checkmark for the items you wish to upload and tap “Upload” (figure 12).
- To delete a Report form, tap the trash can icon next to the Report form (figure 12).
- To add photos to a Report form, from the Report form screen, tap “Camera” or “Photos” then “Camera” to take a photo and associate to the form (figure 14). If a photo has been saved for a Report form, a small preview of the photo is displayed on the list of saved Report forms on the device (figure 12). To enlarge a photo, tap the photo thumbnail. Tap again to close.
- To delete a photo, tap the trash can icon for the photo in the “Photos” screen for that Report form (figure 14).
- To generate a Search Marking for the Worksite Report form, tap the “Marking” menu on the Report form screen. The Worksite ID must match an existing Triage form Worksite ID in order for the Hazards and Triage Category to appear (figure 15).
- To share a Report form to another user via a web link (URL), tap the “Share” menu option on the Report form, then select your desired method to share the form (similar to figure 10). If the recipient opens the link without the app installed on their device, or on a desktop/laptop email client, the link will open an INSARG pdf form with the Report Form, and any saved Photos.
- To view the pdf INSARAG guidelines for Report forms, tap the “Guidance” menu link in the Report Form screen (similar to figure 11).
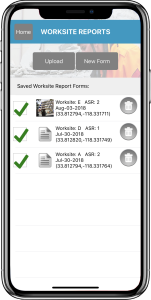 Figure 12. Worksite report home |
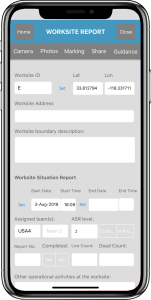 Figure 13. Worksite Report form |
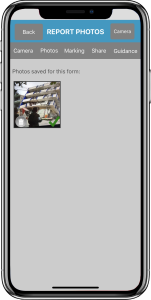 Figure 14. Report form photos |
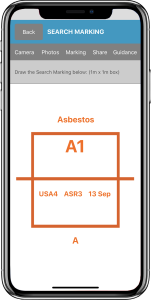 Figure 15. Search marking |
1.6.Victim Extrication Forms
- To access the Victim Extrication forms, tap the “Victim Extrication” button on the home screen.
- To start a new Victim Extrication form, tap the “New Form” button on the Victim Extrication home screen (figure 16). This will start a fresh Victim Extrication form (figure 17).
- To save and close a Victim form, tap “Home” or “Close”. If the minimum mandatory information for the form has not been entered, the fields will highlight in red. If “Close” is tapped, the form is closed, and the user is returned back to the list of saved Victim forms (figure 16). If ‘Home” is tapped without tapping “Close” first, the user returns back to the app home screen, and upon tapping “Victim Extrication” again, is returned back to the currently opened form (figure 17).
- To upload Victim Extrication forms to the server (for Team Admins and Ops Coordinators), check the checkbox with a green checkmark for the items you wish to upload and tap “Upload” (figure 16).
- To delete an existing Victim form, tap the trash can icon next to the Victim form (figure 16).
- To add photos to a Victim form, from the Victim form screen, tap “Camera” to take a photo and associate to the form (figure 18). If a photo has been saved for a Victim form, a small preview of the photo is displayed on the list of saved Victim forms on the device (figure 16). To enlarge a photo, tap the photo thumbnail in the photo gallery for that form, tap again to close the large photo.
- To delete a photo, tap the trash can icon for the photo in the “Photos” screen for that Victim form (figure 18).
- To share a Victim form to another user via a web link (URL), tap the “Share” menu option on the Victim form, then select your desired method to share the form (similar to figure 19). If the recipient opens the link without the app installed on their device, or on a desktop/laptop email client, the link will open an INSARG pdf form with the Victim Form and any saved photos.
- To view the pdf INSARAG guidelines for Victim forms, tap the “Guidance” menu link in the Victim Form screen (similar to figure 11).
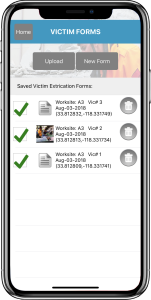 Figure 16. Victim form home |
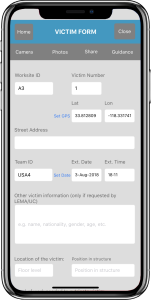 Figure 17. Victim form |
 Figure 18. Victim form photos |
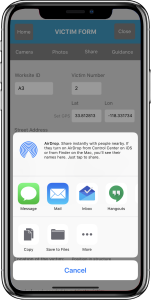 Figure 19. Share Victim form |
1.7.Sector Assessment Forms
- To access the Sector Assessment forms, tap the “Sector Assessment” button on the home screen.
- To start a new Sector Assessment form, tap the “New Form” button on the Sector Assessment home screen (figure 20). This will start a fresh Sector Assessment form (figure 21).
- To save and close a Sector form, tap “Home” or “Close”. If the minimum mandatory information for the form has not been entered, the fields will highlight in red. If “Close” is tapped, the form is closed, and the user is returned back to the list of saved Sector forms (figure 20). If “Home” is tapped, the user returns back to the app home screen, and upon tapping “Sector Assessment” again, is returned back to the last opened Sector form (figure 21).
- To upload Sector Assessment forms to the server (for Team Admins and Ops Coordinators), check the checkbox with a green checkmark for the items you wish to upload and tap “Upload” (figure 20).
- To delete an existing Sector form, tap the trash can icon next to the Sector form (figure 20).
- To add photos to a Sector form, from the Sector form screen, tap “Camera” to take a photo and associate to the form (figure 22). If a photo has been saved for a Sector form, a small preview of the photo is displayed on the list of saved Sector forms on the device (figure 20). To enlarged a saved sector form, tap the photo thumbnail in the photo gallery for the Sector form, and tap again to close.
- To delete a photo, tap the trash can icon for the photo in the “Photos” screen for that Sector form (figure 20).
- To share a Sector form to another user via a web link (URL), tap the “Share” menu option on the Sector form, then select your desired method to share the form (similar to figure 23). If the recipient opens the link without the app installed on their device, the link will open an INSARG pdf form with the Sector Form, list of any associated Worksites/Waypoints and any saved photos.
- To view the pdf INSARAG guidelines for Sector forms, tap the “Guidance” menu link in the Sector Form screen (similar to figure 11).
- To associate saved Worksites and Waypoints to the Sector form, tap the “Worksites” menu link on the Sector form screen (figure 21). This will open a list of all associated Worksites and Waypoints to this Sector form (figure 24).
- To add a Worksite to the Sector form, tap the “Add Worksite” button on the Sector Worksites/Waypoints list screen (figure 24). This will open a list of all unassigned Worksites in your device that can be associated to the current Sector form (figure 25). Simply check the checkbox to show a green checkmark, then tap “Back”. Your selected Worksites will now appear on figure 24 and will no longer display on figure 25.
- To unassociated a Worksite from a Sector form, tap the minus button on figure 24. This will release the Worksite back to the available list of Worksites to add to Sector forms (figure 25).
- To add a Waypoint to the Sector form, tap the “Add Waypoint” button from figure 24. This will open a list of all available saved Waypoints on the device to add to your Sector form. Simply check the checkbox to show the green checkmark and tap “Back”. Your chosen Waypoints will now appear in the list of associated Worksites/Waypoints in figure 24.
- To remove a Waypoint from a Sector form, simply tap the minus button next to the Waypoint in figure 24. As a note, any Waypoint that is associated to a Sector form will not be available for delete from the saved Waypoints list screen in the GPS section of the app until the Waypoint is released from the Sector form or the Sector form with the Waypoint associated to it is deleted from your device.
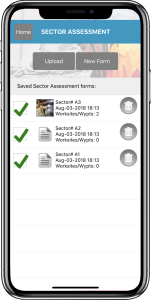 Figure 20. Sector forms home |
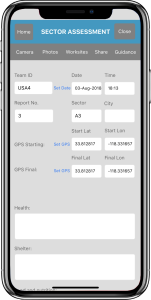 Figure 21. Sector form |
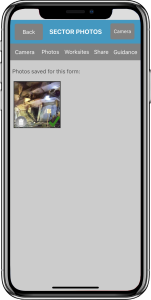 Figure 22. Sector form photos |
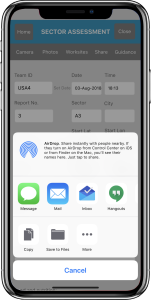 Figure 23. Share Sector form |
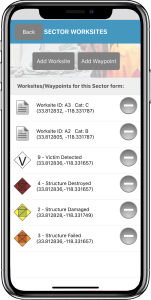 Figure 24. Sector attachment list |
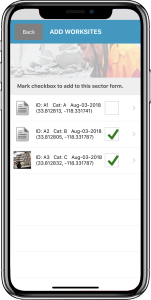 Figure 25. Select worksites list |
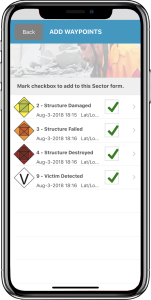 Figure 26. Waypoints select list |
1.8.GPS Tracking
- To access the GPS screen, tap the “GPS” button on the bottom menu of the home screen (figure 28) For CERT and US domestic versions, tap the “GPS Waypoints” button on the home screen. The GPS home screen shows the current latitude and longitude, the current heading, altitude and accuracy numbers (figure 27). The CERT and US domestic versions also show the USNG coordinates as well. (IMPORTANT NOTE: It is highly recommended to use a smartphone or tablet device that has Cellular Data capabilities, as some units without it do not include a dedicated Assisted GPS chip). The GPS data on the screen are in WGS84 datum and Decimal format (International Standards).
- To start GPS tracking, tap the “Tracks on/off” button on the bottom left of the GPS screen. When you do, a green “Tracking On” indicator turns on, along with buttons for “Save Track” and “Reset Track” (figure 27). While Tracking is on, you may continue to use other features of the app. The same green indicator will display on the home screen of the app. The green “Tracking On” indicator can be tapped to pause tracking, which will turn the indicator orange (figure 28). Tapping the “Tracks on/off” button on the GPS screen will also toggle on/pause.
- To stop and save the current set of GPS tracks, tap the “Save Track” button. This will save the current Track set and take you to the saved Track Sets screen with a default name (figure 29). To view your track set on a map, tap the name of the saved Track Set (figure 30).
- To turn off GPS Tracking and not save your tracks, tap the “Reset Track” button after either pausing by tapping the green “Tracking On” Or “Tracks on/off” button on the bottom of the GPS screen (figure 27). The unsaved GPS Tracks will remain in memory until you tap “Save Track” or “Reset Track”.
- To rename a Track Set before uploading, tap the Edit icon next to the Track Set name.
- To delete a Track Set, tap the trash can icon next to the Track Set. To upload to the server, check the checkbox with the green checkmark (figure 29), then tap “Upload”.
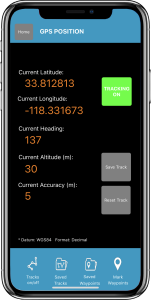 Figure 27. GPS screen |
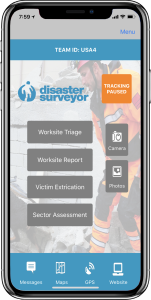 Figure 28. Home GPS indicator |
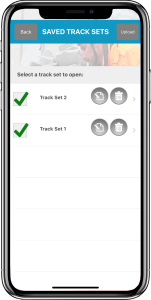 Figure 29. Saved tracks list |
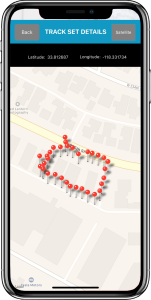 Figure 30. Tracks map |
1.9.GPS Waypoints
- To save a GPS Waypoint, tap the “Mark Waypoint” button on the bottom right of the GPS screen. This will take you to a screen with various GPS Waypoints to choose from (figure 31). Select the GPS Waypoint type and a detailed screen for the GPS Waypoint type appears (figure 32). This page will auto fill with the current GPS lat/lon, as well as the type of Waypoint (and USNG for CERT/US domestic versions). There are options to add notes in the “Waypoints Notes” field, as well as attaching photos to the Waypoint.
- To add a photo to the Waypoint, tap the “Photo” button on the top of the Waypoint details screen (figure 32) or tap the empty photo icon. Once a photo is saved, tap “Save” to save your notes and/or photo, then tap “Done”.
- To add additional photos to the Waypoint, tap the “Add Another Photo” button that appears below the thumbnail of the current photo thumbnail or tap the “Photo” button again at top.
- To manage your photos saved to the Waypoint, tap the thumbnail of the photo. This will take you to the photo gallery screen, where you can delete photos by tapping the trash can icon for the photo thumbnail (figure 34b). To see a larger version of the photo, tap a photo thumbnail once to enlarge, then tap again to close. As a note, the last photo of the photo set is used as the current Waypoint photo thumbnail, but all photos in the photo gallery for the Waypoint are uploaded to the server, when you upload your Waypoints.
- To see a list of saved GPS Waypoints, tap the “Saved Waypoints” button on the bottom of the main GPS screen (figure 27). This will display a list of all saved Waypoints in your device (figure 33). To see details of a saved Waypoint, tap the desired saved Waypoint. This will display the Waypoint details like figure 32.
- To see your saved Waypoints on a map, tap the “Show on Map” button on the upper right of the “My Waypoints” screen (figure 33). Once on the map, you can tap an icon to delete via the trash can icon for it, or change the type of Waypoint by tapping the edit icon for the Waypoint, and picking a new Waypoint type (figure 34).
- To upload your saved Waypoints to the server, check the checkboxes with the green checkmark for desired Waypoints and tap the “Upload” button (figure 33).
- To delete a Waypoint, check the checkbox and tap the “Delete” button. (Important Note: if a Waypoint is currently assigned to a Sector form, you will first need to remove that Waypoint from the Sector Form it belongs to, before deleting from your list of Saved Waypoints). When finished, tap the “Done” button on the upper left of the screen you are on to return to the GPS home screen (figure 27).
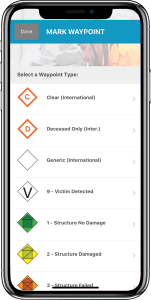 Figure 31. Waypoint select list |
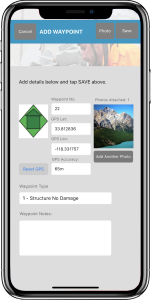 Figure 32. Add Waypoint screen |
 Figure 33. Saved waypoints list |
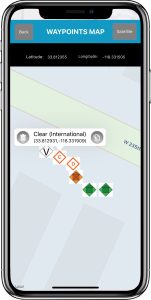 Figure 34. Waypoints map |
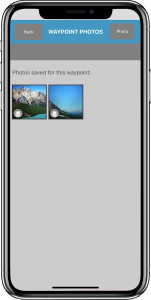 Figure 34b. Waypoint photos |
1.10.Maps
- To save a map for later use (i.e. if you may be offline at your search and rescue site), tap “Live Map” from the Maps home screen (figure 35) to open a new live map (figure 36). If you zoom in to the areas of the map you will be using later, those objects and street names, buildings, and details will be saved for offline use if zoomed in and viewed, prior to saving the map. When done, tap “Save” at the top of the live map screen and your newly saved map will appear on the saved maps list screen (figure 37).
- To rename a map, from the Saved Maps list screen (figure 37), tap the edit icon next to the map name.
- To delete a map, tap the trash can icon next to the map name.
- To view a map, tap the name of the saved map. This will open the saved map even in offline mode.
- To drop a map point, on the saved map screen, tap and hold a point on the map and a pin will drop at that lat/lon point. Tapping the pin head will show details of the point created.
- To delete a map point, tap the trash can icon for the point label that appears when you touch the pin.
- To toggle the map view, tap the “Street” or “Satellite” button at the top of the map. (Note: For Android versions of the app, a “Terrain” option is also available.)
- To download a pdf map to use in the app, tap the “Add from URL” button from the Maps home screen (figure 35). This will show a screen to enter a URL to a pdf map to download (figure 39). (Note: make sure to add http:// or https:// before your website address to make it a full URL). If your pdf map is very large in size, reducing the pdf map size to a smaller file is recommended. After download of the pdf file, the saved maps screen will be displayed with the name of your pdf map (figure 37). Tap the name of the pdf map to open (figure 40). If a map is left open and “Back” is tapped, followed by “Home”, Tapping on “Maps” from the home screen will directly go to the last opened map.
- To close a map, tap “Close” on the upper right of the Map Details screen (figure 40).
- To scan a QR/bar code with a URL to a map to download, tap the “Scan QR Code” button on the Maps main screen (figure 35). Put the QR/bar code in the red area of the camera view and the app will automatically detect and download the file if it is a valid pdf file. To open the map after saving, tap the name of the map in the Saved Maps screen in figure 37.
 Figure 35. Maps home |
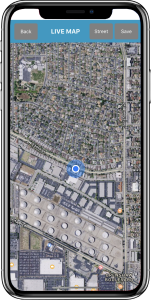 Figure 36. Live map |
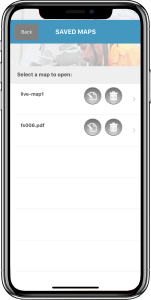 Figure 37. Saved maps |
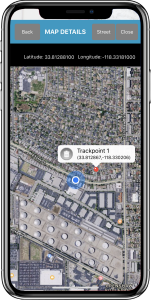 Figure 38. Saved map points |
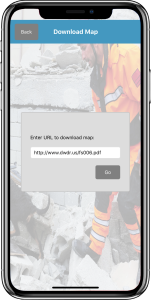 Figure 39. Download pdf map |
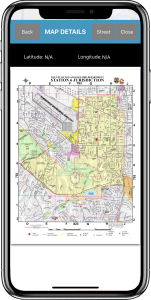 Figure 40. View pdf map |
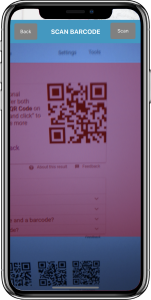 Figure 42. Barcode scanner |
1.11.Team Messaging
- To view team messages, tap the “Messages” button on the bottom left of the app Home screen (figure 43). If a new team message exists, the icon will turn red to indicate a new unread message exists. Opening the team messages screen will remove the red indicator.
- To send a new team message, enter your text message on the “Enter Message Here” line, then tap “Send” on the Team Messages screen (figure 44).
- To delete messages that belong to you, tap the trash can icon next to your message. Your message will then be removed from the server and apps. (Note: The app checks for new messages upon opening or returning to the app home screen behind the scenes. All messages in your app are automatically refreshed to the latest set).
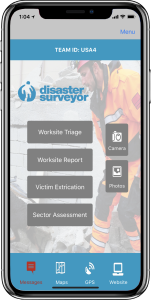 Figure 43. Message indicator |
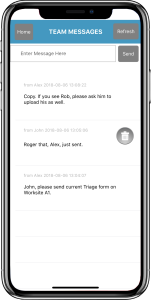 Figure 44. Team messaging |
1.12.Team Code
- To view your Team code, tap the top header bar of the app home screen (figure 43) or tap “menu” on the top right of the home screen and selecting “Team Code”. A screen with your current Team code will appear (figure 46).
- To change your Team code, enter the team code on this screen and tap “Update”. The Team Admins and Ops Coordinators for the new team code will receive a notice to approve or deny your request. Until the request is processed, the top bar of your home screen will turn orange color with the words “Pending” attached (figure 1).
 Figure 45. Team Code |
1.13.App Settings
- To open the Settings screen, from the app home screen, tap “menu” in the upper right, then choose “Settings”. You will be displayed the Settings screen (figure 47).
- The “Logged in as:” displays which email address account is currently logged into the app.
- “Use Low Bandwidth” setting: When set to “On”, the app will only upload minimal text based data for each of the forms to the server to save on data. When set to “off”, any photos saved to forms or waypoints are also uploaded to the server.
- “Offline Mode” setting: When set to “On”, the app will generate raw JSON code to share between devices for each form’s sharing option. Using Airdrop via Bluetooth or other device to device connection, the app can share form data directly to another user’s device with Disaster Surveyor installed. (Note: For iOS, offline sharing between devices is done through Airdrop. On the recipient side, the link shared should be opened in notes or an app that will show the link as a hyperlink, then tapping the link will automatically open the form in the app.)
- “UI Language” setting: This change the interface Language as well as the INSARAG forms to a different language. Currently supported languages are English and Spanish (figure 50).
- “GPS Tracking Interval” setting: This is the GPS tracking interval time that the app waits before querying the location services of the app for the current geolocation coordinates.
- “GPS Tracking Distance” setting: This is the minimum distance delta that the device geolocation services must report back to save a position during tracking.
- “Compass Calibration” setting: When turned “On”, the device will display the compass calibration tool for each device platform when compass calibration is needed. This is turned “off” by default to prevent excess compass calibrations during most use cases.
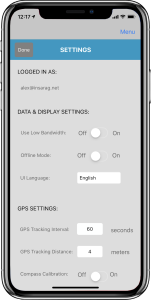 Figure 47. App Settings |
 Figure 50. Spanish interface |
1.14.Photos and Cameras
- To view all photos in the app, tap “Photos” on the right side of the app home screen (figure 48).
- To take an unassigned photo, tap “Camera” on the right side of the home screen. This will add a photo to the app that is not yet assigned to any form or waypoint. To have a photo assigned automatically to a form or waypont, it is recommended to just take a photo on the Waypoint details screen, Add New Waypoint screen, or while a form is open using the “Camera” or “Photo” options in the menu bar of the form details.
- To delete a photo, tap the trash can icon for the photo thumbnail.
- To disassociate a photo from a form or waypoint, tap the “trash can” icon for the thumbnail. Please note that this will also delete the photo from the main photo gallery as well.
- To make the photo larger, tap the photo thumbnail, then tap again to close (figure 48b).
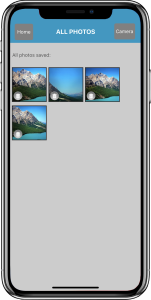 Figure 48. Photo gallery |
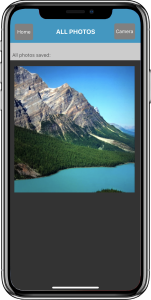 Figure 48b. Enlarged photo |
1.15.Account Website + Tools
- To visit the account website from the app, tap the “Website” icon on the bottom right of the home screen. This is the mobile friendly version of the website at https://www.disastersurveyor.com/login/. (Note 1: the mobile version of the website has a few management options removed due to space constraints. It is recommended to always use the full desktop browser version of the site for Team Admins and Ops Coordinators. Note 2: In the CERT app, the button will open the CERT website at https://cert.disastersurveyor.com while the US domestic app will open https://us.disastersurveyor.com. Users of organizations and countries with their own custom management website will open their websites.).
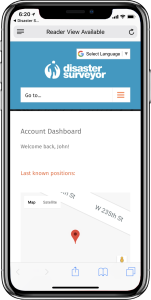 Figure 49. Account website |
1.16.Other App Functionality
- All form data resides in the app until they are uploaded to the server. Same goes for all GPS track sets and GPS waypoints.
- If a user logs out and a new user logs in, the forms and data from all users still reside in the app. When any data is uploaded to the server, the currently logged in user is marked as the person associated to those forms, GPS Track sets and GPS Waypoints.
- For Spanish version PDF forms for the reports, please use https://lac.disastersurveyor.com to log in and manage your data.
2.Team Management Website
2.1.Account Home
-
- To view last known locations of your users, log into the appropriate website with your Team Admin or Ops Coordinator account (https://www.disastersurveyor.com/login for international, https://cert.disastersurveyor.com for CERT, https://us.disastersurveyor.com for US domestic, and https://lac.disastersurveyor.com for Spanish international). Upon logging in, a list of all team members is listed below the map (figure 51). Clicking on the placemark on the map for each user displays their name, Team Code, date/time, and lat/lon coordinates. (Important Note: These points are saved when a team member opens the Disaster Surveyor app and is viewing the app home screen.)
- To approve or decline new users to your team, simply click either the ‘approve’ or ‘decline’ links at the top of the website home or in the ‘Account’ page (figure 51b). Only users who are approved are shown the contents of the Team Messaging feature and files, images, and waypoints data shown on the team account for Team Leaders and Ops Coordinators.
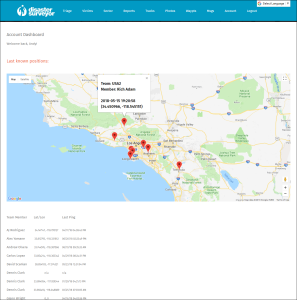 Figure 51. Team members map |
|
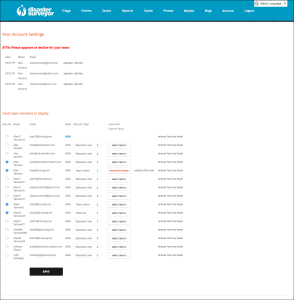 Figure 51b. New user approvals |
2.2.Triage Forms
- To view uploaded Triage forms by team members, click “Triage” in the main menu in the website (figure 52). The Triage forms listed are for those team members that have been checked to display in the “Accounts” section of the website. A list of which team member data is currently on display is listed at the top of each form page (figure 51). For Ops Coordinators, a “view only” version of external team code members shared to your team can also be seen here, if selected for view. Standard users will only see their own data on all sections of the website.
- To see the location of Triage forms on a map, check the checkboxes next to the desired Triage forms on the left most column, then click the “map” button above it (figure 53).
- To delete Triage forms, check the checkboxes and click the “Del” button on the bottom of the list. Clicking on “Delete” link for a Triage form deletes that form only as well.
- To edit a Triage form, click on “Edit” for a Triage form (figure 53).
- To view a populated pdf form of a Triage form, click the “View” link or the pdf icon for a Triage form (figure 54).
- To mark “Completed” status for Triage forms, check the checkboxes in the “Completed” column and click the “Update” button at the bottom right of the screen.
- To add notes to any Triage form, add content in the “Notes” boxes to the right of the Triage form and click “Update” at the bottom right of the screen. This same box also appears at the top of the Edit screen in figure 53.
- To download the Triage form data as an Excel file, click “Export Excel” in the upper right of the screen (figure 55).
- To download a KML file for the Triage forms, check the checkboxes for the desired Triage forms in the first column, then click the “download KML” link on the upper right of the screen.
- To download a GPX file for the Triage forms, check the checkboxes for the desired Triage forms in the first column, then click the “download GPX” link on the upper right of the screen.
- To sort the Triage form display, select sort by “Latest updates first”, “Worksite ID”, or “Save by name” in the drop down at the top left of the screen.
- To add a new Triage form on the website, click the “Add New Triage Form” link on the upper left of the screen.
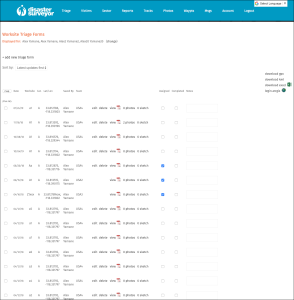 Figure 52. Triage form home |
|
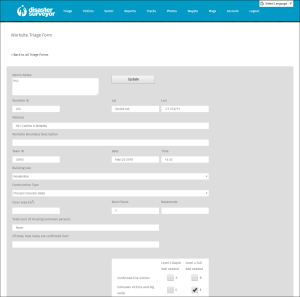 Figure 53. Edit Triage form |
|
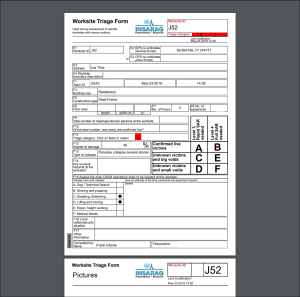 Figure 54. Triage form pdf |
|
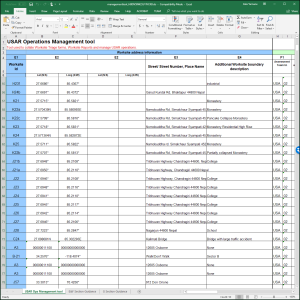 Figure 55. Excel download |
2.3.Victim Forms
- To view all uploaded Victim forms, click the “Victims” link in the main menu (figure 56). The Victim forms listed are for those team members that have been checked to display in the “Accounts” section of the website. A list of which team members’ data are currently displayed is shown in a list at the top of the page.
- To see a map of where the Victim forms are located, check the checkboxes next to the desired Victim forms on the left most column, then click the “map” button above it (figure 56).
- To delete Victim forms, check the checkboxes for the desired forms and click the “Del” button on the bottom of the list. Clicking on the “Delete” link for a Victim form deletes that form only as well.
- To edit a Victim form, click the “Edit” link for desired Victim form (figure 56b).
- To view a merged pdf of the Victim form, click the “View” link or the pdf icon (figure 57).
- To mark “Completed” status for Victim forms, check the checkboxes in the “Completed” column and click the “Update” button at the bottom right of the screen.
- To add notes to any Victim form, add content in the “Notes” boxes to the right of the form and click “Update” at the bottom right of the screen. This same box also appears at the top of the Edit screen in figure 56b.
- To download a KML file for the Victim forms, check the checkboxes for the desired Victim forms in the first column, then click the “download KML” link on the upper right of the screen.
- To download a GPX file for the Victim forms, check the checkboxes for the desired Victim forms in the first column, then click the “download GPX” link on the upper right of the screen.
- To sort the Victim form display, select sort by “Latest updates first”, “Worksite ID”, or “Saved by name” in the drop down at the top left of the screen.
- To add a new Victim form on the website, click the “Add New Victim Form” link on the upper left of the screen.
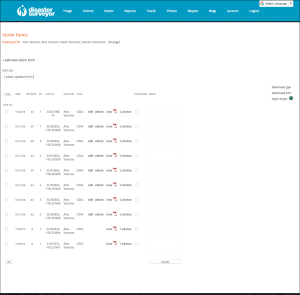 Figure 56. Victim forms home |
|
 Figure 56b. Edit victim form |
|
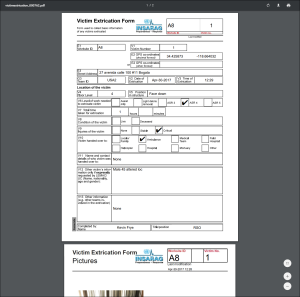 Figure 57. Victim form pdf |
2.4.Sector Forms
- To view all uploaded Sector forms, click “Sector” in the main menu (figure 58). The Sector forms listed are for those team members that have been checked to display in the “Accounts” section of the website. A list of currently selected users is displayed at the top of the screen.
- To delete Sector forms, check the checkboxes for the desired forms and click the “Del” button on the top of the column of checkboxes. Clicking the “Delete” link for a specific Sector form deletes that form only.
- To edit a Sector form, click on the “Edit” link for a Sector form (figure 59).
- To view a merged pdf of the Sector form, click the “View” link or the pdf icon for the desired Sector Form (figure 60). The pdf report will contain the main Sector form data, any waypoints associated to the Sector as a list, and any Waypoints associated to the Sector as a list, as well as any photos attached.
- To mark “Completed” status for Sector forms, check the checkboxes in the “Completed” column and click the “Update” button at the bottom right of the screen.
- To add notes to any Sector form, add content in the “Notes” boxes to the right of the form and click “Update” at the bottom right of the screen. This same box also appears at the top of the Edit screen in figure 59.
- To add a new Sector form, click the “Add New Sector Form” link on the upper left of the screen.
- To view a list of attached Waypoints and Worksites to a Sector form, click the “View List” link (figure 61).
- To add existing Worksite Triage forms or GPS Waypoints to this Sector form, click the appropriate button at the top of the “View List” page (figure 61). Check the checkboxes for the items you wish to add to this Sector Form, then click “Add Checked Worksites” (figure 62) or “Add Checked Waypoints” (figure 63), and these items will be associated to this Sector form.
- To view the attached Waypoints or Triage forms on a map, from the “View List” page (figure 61), check the checkboxes for desired items, then clicking on the “Map” button above the list.
- To remove attached Worksite Triage or GPS Waypoints, check the checkboxes for desired items, and click the “Del” button at the bottom of the list. Clicking on the “Delete” link for a specific item will only delete that particular item.
- To download Waypoints and Worksites in Excel, click the “Export Waypoints” link or Excel icon on the upper right of the “View List” page (figure 61). This will download all of the Waypoints and Worksite info into an Excel file (figure 64), along with any GPS Waypoint icons and photo previews embedded in the Excel file.
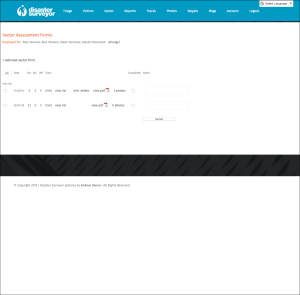 Figure 58. Sector form home |
|
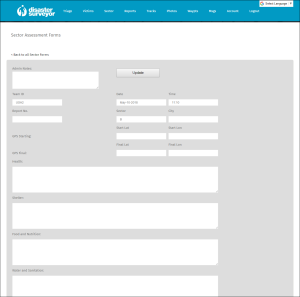 Figure 59. Edit Sector form |
|
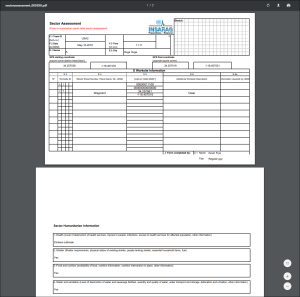 Figure 60. Sector form pdf |
|
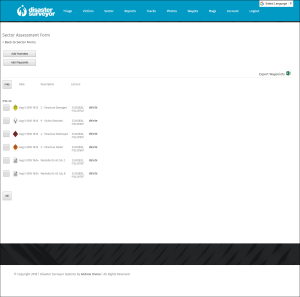 Figure 61. Sector form attachments |
|
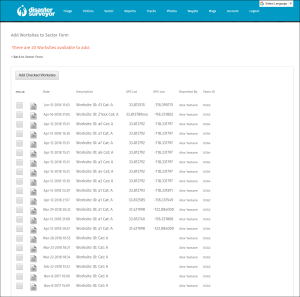 Figure 62. Attach Worksites list |
|
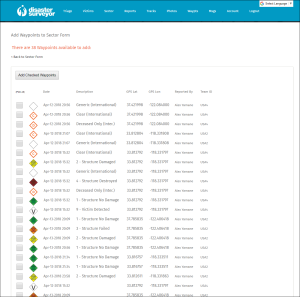 Figure 63. Waypoint attach list |
|
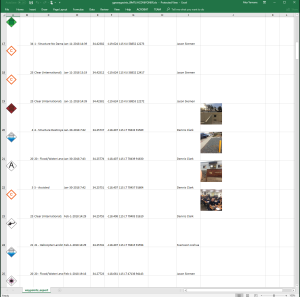 Figure 64. Sector Waypoints download |
2.5.Report Forms
- To view all uploaded Report forms, click the “Reports” link in the main menu. The Report forms listed are for those team members that have been checked to display in the “Accounts” section of the website. A list of users whose forms are currently displayed is shown at the top of the screen.
- To see a map of locations of the Report forms, check the checkboxes next to the desired Report forms on the left most column, then click the “map” button above it (figure 66).
- To delete Report forms, check the checkboxes in the left most column for desired forms and click the “Del” button on the bottom of the list. Clicking on the “Delete” link for a Report form deletes that form only as well.
- To edit a Report form, click on the “Edit” link for a Report form (figure 68).
- To view a merged pdf of the Report form, click the “View” link or the pdf icon for desired Report form (figure 69).
- To mark “Completed” status for Report forms, check the checkboxes in the “Completed” column and click the “Update” button at the bottom right of the screen.
- To add notes to any Report form, add content in the “Notes” boxes to the right of the form and click “Update” at the bottom right of the screen. This same box also appears at the top of the Edit screen in figure 68.
- To download an Excel file for the Report forms, click on the “Export Excel” link in the upper right of the page (figure 70).
- To download a KML file for the Report forms, check the checkboxes for the desired Report forms in the first column, then click the “download KML” link on the upper right of the screen.
- To download a GPX file for the Report forms, check the checkboxes for the desired Report forms in the first column, then click the “download GPX” link on the upper right of the screen.
- To sort the Report form display, select sort by “Latest updates first”, “Worksite ID”, or “Saved by name” in the drop down at the top left of the screen.
- To add a new Report form, click the “Add New Report Form” link on the upper left of the screen.
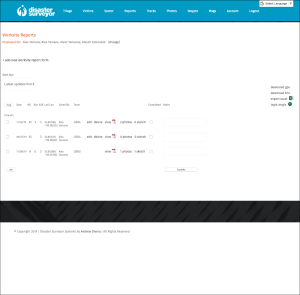 Figure 66. Report forms home |
|
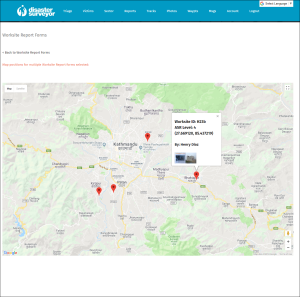 Figure 67. Report forms map |
|
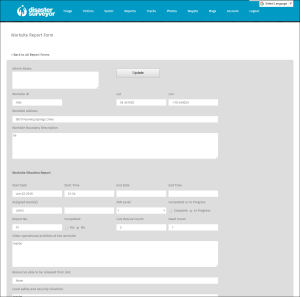 Figure 68. Edit Report form |
|
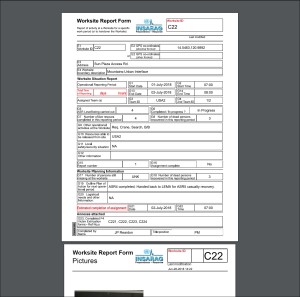 Figure 69. Report form pdf |
|
 Figure 70. Excel download |
2.6.GPS Track Sets
- To view uploaded GPS Track sets, click on the “Tracks” link in the top menu (figure 71). Team members whose data appears on this page is displayed at the top of the page and can be edited in the “Account” section of the website.
- To view individual tracks for a Track set, click on the name of a Track set or the “View Tracks” link for the desired Track set on a map (figure 72).
- To download a GPX file of a Track set, click the “GPX File” link for the desired Track set (figure 73).
- To download a KML file of a Track set, click the “KML File” link for the desired Track set (figure 73).
- To delete a Track set, click the “delete” link for the desired Track set.
- To sort the Track set display, select sort by “Track sets name”, “Created datetime”, “Track set lat/lon” or “Saved by name” in the drop down at the top left of the screen.
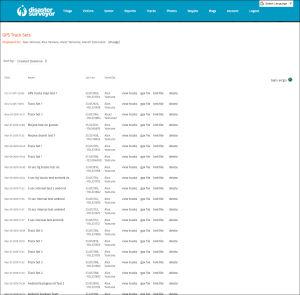 Figure 71. GPS Tracks home |
|
 Figure 72. GPS Tracks map |
|
 Figure 73. GPX/KML download |
2.7.Photos
- To view all photos for the team, click on the “Photos” link in the top menu (figure 74). Photos are displayed for users that are currently selected for display in the “Account” section of the website. These users are listed at the top of the page.
- To view a preview of the thumbnail, move the mouse over a thumbnail (figure 74).
- To view a full size of the photo, click on the “Open” link under a photo.
- To delete a photo, click the “Delete” link under a specific photo or check the checkbox above the thumbnails next to the title of the photo and click the “Delete checked photos” button above the rows of photos.
- To sort the Photo gallery display, select an option for the “Show photos for:” drop down at the top. Options include “All Forms” or a specific form the photos belong to.
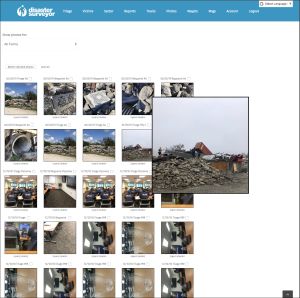 Figure 74. Photo gallery |
2.8.GPS Waypoints
- To view GPS Waypoints uploaded by the team, click on the “Waypts” link in the top menu (figure 75). GPS Waypoints are displayed for team members selected for display in the “Account” section of the website. A list of which team members’ data is shown is displayed at the top of the page.
- To see a map of where the GPS Waypoints are located, check the checkboxes next to the desired GPS Waypoints on the left most column, then click the “map” button above it (figure 76).
- To delete multiple GPS Waypoints, check the checkboxes and click the “Del” button on the bottom of the list.
- To download a GPX file of the Waypoints, select the checkboxes for desired Waypoints and click the “Download GPX” link on the upper right of the page.
- To download a KML file of the Waypoints, select the checkboxes for desired Waypoints and click the “Download KML” link on the upper right of the page.
- To download an Excel file of the Waypoints, select the checkboxes for desired Waypoints and click the “Download Excel” link or Excel icon on the upper right of the page. The Excel file will include both the Waypoint icons as well as thumbnails of any photos saved for each Waypoint (figure 77). For Waypoints collected using the US Domestic version of the app, downloading the Excel file in the corresponding website at https://us.disastersurveyor.com will also include all of the extended “follow up form” fields.
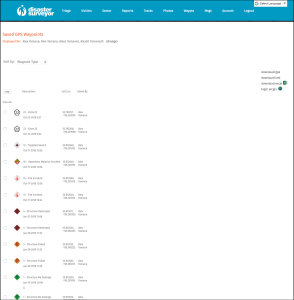 Figure 75. GPS Waypoints list |
|
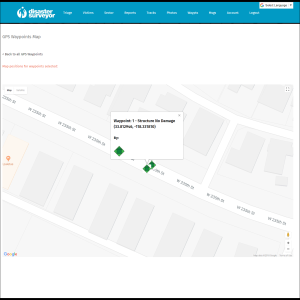 Figure 76. GPS Waypoints map |
|
 Figure 77. GPS Waypoints download |
2.9.Team Messaging
- To view all team messages, click on the “Msgs” link in the top menu (figure 78).
- To send a message to the entire team, the Team Admin or Ops Commander can enter a new message to the entire team in the open box at the top of the page, and click “Send” to have it show as a pending message on the app home screen (i.e. the Messages icon on the bottom left of the app home screen will turn red).
- To delete a specific team message, click on the “Delete” link next to that message.
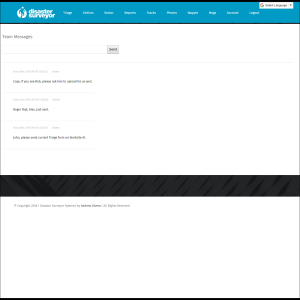 Figure 78. Team messages |
2.10.Account Settings
- To view the team account settings, clicking on the “Account” link in the top menu (figure 79). Team Admins and Ops Coordinator users will see a list of their team members on this page. Standard users will only see a set of fields to update their account first and last names, email and password, as well as to update their Team Code.
- To select team members data to display, check the checkbox next to the person’s name in the far-left column, then click “Save” at the bottom of the list. To confirm that those users are now appearing on your website account, click on the “Disaster Surveyor” logo on the upper left, and confirm these team members are displayed below the “Last Known Location” map.
- To change the team member account level, select the desired account level for that user in the “Account Type” drop down for that user. This option is only available to Team Admin accounts. The options available are: “Standard User”, “Observer”, “Ops Coordinator”, and “Team Admin”. A “Standard User” can only see their own data when logged into the website. The “Ops Coordinator” account can see and manage all team member data with the exception of not being able to change the access levels for team members. The “Observer” account is just like “Ops Coordinator” but with “view only” restrictions on the entire website. The “Team Admin” account is the master account for your team that can change team member access levels as well as manage every aspect of their team account. After setting desired access level changes, click the “Save” button below the set of team member names.
- To share a team member’s data with an external team, click the “Select Teams” button in the “Share with external team” column, and check the checkbox for one more Team Codes and click “Save”. Once set to share, those users will appear on the Account page for the team code they are shared to.
- To unshare a team member with an external team, click the “unshare this user” link next to the drop down list of shared Team Codes.
- To remove a team member from your team, click on the “Remove from my team” link. Once a member has been removed from your team, they will need to re-request being added back to your team by updating their Team Code in the app’s “Team Code” settings screen. When a user is removed from an existing team, their Team Code will be removed from their app, and the top bar of the home screen of the app will just display “Disaster Surveyor” (or “CERT Surveyor” or “US Disaster Surveyor” depending on the app) instead of the Team Code they belong to.
- To approve or decline a new member for your team, click on the “approve” or “decline” link next to the new requesting member’s name. This section will appear at the top of both this “Account” page as well as on the website dashboard home.
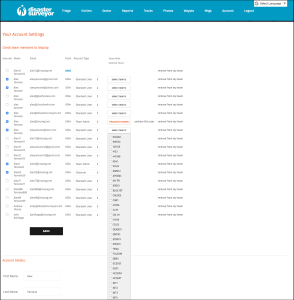 Figure 79. Account settings |
2.11.SMS Team Dispatch
SMS Team Dispatch is a new premium feature for the Disaster Surveyor family of team management websites. After upgrading to a premium account, your “team” page will now display a button for “team dispatch sms” (figure 80). Clicking it will open the SMS Team Dispatch page (figure 81).

Figure 80. The main “Team” management page.

Figure 81. The SMS Dispatch page.
- To send an sms dispatch text to your team members, select the team members from your list by checking the checkbox next to their name. Next, fill out the dispatch info you wish to send out in the form below the list of names (figure 82). These fields include: Event Name, Location to Meet At, Meeting time, and any short instructions that are sent to those who respond affirmative. When ready, click the “Send” button.

Figure 82. Filling out the SMS Dispatch page.
- The person you are sending an SMS to must have both a phone number and the “opt-in for SMS…” checked in their “account” page.
- First time users who receive a text from Disaster Surveyor will require their consent by texting “OPTIN” when prompted to do so. The very first permission request text will read: “Disaster Surveyor Alerts: Reply OPTIN to confirm receiving alerts from Disaster Surveyor. Text OPTOUT to end. Msg&Data Rates May Apply.” (Please note that we do not charge on a per sms/text basis, this is solely regarding the sms/text/data service your team member’s phone is using).
- Please be sure that in the “Account” page, your team member has their phone number entered correctly. The first box is for the country code (“1” for US/Canada), and the 2nd bigger box is rest of the phone number.
- If a user has already been sent an active Dispatch Event, the checkbox for that user is disabled until the events are reset by clicking the “Reset” button.
- You can select as many people to send out dispatch SMS texts to as you have licenses, at a time. For example: If you purchased a 10 user license pack for your team, you can pick up to 10 people to send out sms dispatch to at a time. If you wish to use the same 10 licenses for more people on your team, you will need to pick another 10, after the first SMS is sent and so forth.
- The total number of licenses available for your team is the sum of all paid licenses by team members of your team. For example: If you are the team leader and have purchased a 10 pack, and 2 others on your team also purchased their own 1 user license, you have a total of 12 license available for your team code for SMS Dispatch.
- After you click “Send”, your users will receive a text prefaced with your Team Code, and to reply Y if available or N if not, for the Event Name, Meet Location and Meet time (figure 83).
- If the person enters “N” (or “No”), the unavailability will be recorded on the SMS Dispatch screen. If the person replies back “Y” (or “Yes”), the person is further prompted to enter a 4 digit time when they are able to report. For example: 0900 for 9:00am, 1330 for 1:30pm.
- After a person responds affirmatively and has replied back an arrival time, they are displayed the “Any Action to Take” message that you have entered. For Example: Any instructions for the person when reporting, things to bring, any precautions, etc.

Figure 83. A typical SMS Dispatch interaction.
- Clicking the “Refresh” button at the bottom of the page will refresh the Dispatch list, and show a green indicator if the person is available, along with their estimated arrival time. If not available, a red indicator will display (figure 84).
- If you wish to print out the list of respondents, you can also click the “download dispatch replies” link to the right side of the screen. This will download an Excel file with the SMS Dispatch event details at top, and a list of all persons you have sent dispatches to for the event (figure 85).
- Please Note: Only persons who have phone numbers and have opted-in to receive your dispatch texts are included in the Excel download file.

Figure 84. Dispatch respondents statuses.

Figure 85. Excel file of Dispatch respondents.
- SMS Dispatch History can be viewed by clicking on the “Dispatch History” button on the main SMS Dispatch page (figure 86).
- To delete SMS history log, click on the “Delete” link next to the desired SMS log to remove (figure 86).

Figure 86. SMS Dispatch History page.
- Multiple sets of different SMS Dispatches can also be sent through the same interface. This may be useful when your team needs to be split up between multiple events. Simply send one set to one group of users, then send your second set to your other group without clicking “Reset” first. For Example: You may wish to pick team members 1 through 5 for Event A, then pick team members 6 through 10 and send out a dispatch for Event B. Please note that the Excel download for current dispatch responses will currently only work for the most recent SMS Dispatch event (figure 87).
- To reset and clear SMS Dispatch responses, click the “Reset” button below the form fields on the bottom of the main Dispatch page (figure 88).

Figure 87. Sending Multiple SMS Dispatch simultaneously.

Figure 88. Reset and clear SMS Dispatch responses.
- To check SMS opt-ins for users, click the “Toogle opt-in columns” to see the status of each of your users for SMS opt-in. For a user to receive your SMS Dispatch alerts, the “Web Opt-in” column should be “yes”, “SMS Reply Opt-in” should be “yes”, and “SMS Reply Opt-out” should be “no” (figure 89).
- The “Web Opt-in” can be changed in each user’s “Account” page with the “Opt-in to receive SMS…” checkbox. The “SMS Reply Opt-in” is when the user replies back “OPTIN” the very first time they receive an SMS alert from Disaster Surveyor. The “SMS Reply Opt-out” will be “yes” if the user has texted back “OPTOUT” to our system.

Figure 89. Toggle Opt-in Columns to debug User SMS Settings.
2.12.SMS Team Messaging
SMS Team Messaging is a new premium feature for the Disaster Surveyor family of team management websites. After upgrading to a premium account, your team members (with a phone number and “Opt-in to receive SMS…” checked in their “Account” page) will receive an SMS alert that a new message is available in the Team Messaging screen of the app (figure 90):

Figure 90. Generic SMS Alert exists notice.
Direct SMS Team Messages, the actual content of the message someone has posted in team messaging, are received by users who are either assigned a team premium license, or have purchased a license on their own (figure 91):

Figure 91. Direct Team Messages are visible to premium users.
- Your team members can reply back directly via SMS and the message is sent to all team members as well as in the team messaging screen in the app and website.
- The person you are sending an SMS to must have both a phone number and the “opt-in for SMS…” checked in their “account” page.
- First time users who receive a text from Disaster Surveyor will require their consent by texting “OPTIN” when prompted to do so. The very first permission request text will read: “Disaster Surveyor Alerts: Reply OPTIN to confirm receiving alerts from Disaster Surveyor. Text OPTOUT to end. Msg&Data Rates May Apply.” (Please note that we do not charge on a per sms/text basis, this is solely regarding the sms/text/data service your team member’s phone is using).
- Please be sure that in the “Account” page, your team member has their phone number entered correctly. The first box is for the country code (“1” for US/Canada), and the 2nd bigger box is rest of the phone number.
2.13.Posting Waypoints to Any ArcGIS layer
ArcGIS Online Feature Layer posting is a new premium feature for the Disaster Surveyor family of team management websites. After upgrading to a premium account, you now have the ability to post your waypoints data to your own ArcGIS Online Hosted Feature Layer of your choice. Please Note: costs for any ArcGIS Online services are not included in the Disaster Surveyor premium license. You will need to open an ArcGIS account in order to use this data posting service.
- Click on “Login ArcGIS” in the right column of your Waypoints page (figure 97) and log in with your ArcGIS account (figure 98). After successful login, you will be returned back to the Disaster/CERT Surveyor waypoints screen.

Figure 97. Connecting your ArcGIS account to Disaster Surveyor

Figure 98. Logging in with your ArcGIS account
- From your ArcGIS Online Hosted Feature Layer page, copy the URL for the layer from the bottom right box you see in figure 99 and copy it to the URL box you see on the bottom right of your Waypoints page and click ‘Update’.

Figure 99. Feature Layer page on ArcGIS account

Figure 100. Updating ArcGIS Feature Layer URL on Waypoints page
- From your list of saved Waypoints from your team, select items you wish to post to your ArcGIS feature layer, then click “send to arcgis” (figure 101). IMPORTANT NOTE: Please be sure your layer is prepared ahead of time with a Data Table with fields that Disaster Surveyor will send (see “Preparing your ArcGIS feature layer before posting” section below).
- Once your items are successfully posted to ArcGIS, you will see a small ArcGIS icon appear next to the Waypoint that is currently posted (figure 102) and your items will now appear on your Hosted Feature Layer (figure 103).

Figure 101. Picking Waypoints to post to your ArcGIS layer.

Figure 102. Indicator that a Waypoint is shared on ArcGIS.

Figure 103. Sample Operations Dashboard with shared waypoints posted.
- Select the checkboxes for waypoints that are currently shared that you wish to remove, then click “remove sent items” from the menu on the right (figure 104).

Figure 104. Removing Waypoints from ArcGIS layer.
- The ArcGIS feature layer that you are posting to must have a Data table with the following field names attached (figure 105).
- The feature layer must also be set to “Sharing Level: Public (everyone)” (figure 106).

Figure 105. Data Table required on Feature Layer to post.

Figure 106. Layer Sharing must be set to Public/Everyone.
2.14.Archiving Data in Website View
Archiving Team Data is a new premium feature for the Disaster Surveyor family of team management websites. After upgrading to a premium account, Waypoints and any international forms that are uploaded can be archived to keep out of view.
- To archive an item, select the checkbox for that item from the “Archive” column, then click “Update” (figure 92).
- To view archived items, pick the option for viewing “Archived” from the page display settings box at top and click “Save” (figure 93).
- To unarchive items, select the checkbox for that item from the “Unarchive” column, then click “Update” (figure 93).

Figure 92. Archiving items on website.

Figure 93. Viewing archived data on website and Unarchiving.
2.15.Assigning licenses to your team
All new premium features require a user license to use. Team licenses purchased in bulk quantities of 10, 25, 50, 100, 200, 400 or 1000 can be assigned to any non-licensed team member through the main Team page (figure 94):

Figure 94. Team License assignments screen.
- Users who purchase licenses either for themselves or for the team will have a star icon appear in the “Premium license assigned to” column. This indicates the user owns a license and their license cannot be removed nor a team license assigned to them.
- All team members, whether they are assigned a license or not, will be able to receive SMS Team Messaging generic alerts as long as 1 team member for your team code has a license. However, only users who are assigned or own a license will receive the team message content directly to their phones. (For an example of a generic alert message, see SMS Messaging section above)
- Users you have assigned a team license to by checking the checkbox will have premium features available when they log into their accounts. On the team dispatch page, however, these are all always left unselected. You can pick and choose as many people as you have licenses, for each SMS Dispatch sent, and it will not affect the people you have assigned licenses to on the “team” page.
2.16.User License Details
- Users who cancel their license subscriptions within their 30 or 90 day trial periods will continue to be able to use their license for the remainder of the trial period.
- Users who downgrade from a previously higher license tier will continue to be able to use their higher license count for the duration of their remaining trial period from their first purchase.
- Users who upgrade from a lower license count tier will immediately be able to use their new licenses upon upgrade.
- 1 premium license grants you access to: Archiving, Posting Waypoints to your own ArcGIS feature map layer, receiving actual messages sent by team mates in the Team Chat room, and if assigned as a “Team Admin” or “Ops Coordinator” or if you have your own team code and are your own “Team Admin”, the ability to do the SMS team dispatch (send to as many people at a time as you have licenses).
- From your “Account” page, click the “change” link next to your “Account Type” (figure 95) or go directly there at https://www.disastersurveyor.com/account/currentsubscription.php.
- On the Current Subscription page (figure 96), select your new desired tier and continue checkout.
- Please Note: You will not be able to upgrade or downgrade to the same tier as your current license.

Figure 95. Your Account license details page.

Figure 96. Current Subscription page
- From your “Account” page, click the “change” link next to your “Account Type” (figure 95) or go directly there at https://www.disastersurveyor.com/account/currentsubscription.php.
- On the Current Subscription page, click on the “cancel subscription” link to cancel your license subscription (figure 96).