- To access the GPS screen, tap the “GPS” button on the bottom menu of the home screen (figure 28) For CERT and US domestic versions, tap the “GPS Waypoints” button on the home screen. The GPS home screen shows the current latitude and longitude, the current heading, altitude and accuracy numbers (figure 27). The CERT and US domestic versions also show the USNG coordinates as well. (IMPORTANT NOTE: It is highly recommended to use a smartphone or tablet device that has Cellular Data capabilities, as some units without it do not include a dedicated Assisted GPS chip). The GPS data on the screen are in WGS84 datum and Decimal format (International Standards).
- To start GPS tracking, tap the “Tracks on/off” button on the bottom left of the GPS screen. When you do, a green “Tracking On” indicator turns on, along with buttons for “Save Track” and “Reset Track” (figure 27). While Tracking is on, you may continue to use other features of the app. The same green indicator will display on the home screen of the app. The green “Tracking On” indicator can be tapped to pause tracking, which will turn the indicator orange (figure 28). Tapping the “Tracks on/off” button on the GPS screen will also toggle on/pause.
- To stop and save the current set of GPS tracks, tap the “Save Track” button. This will save the current Track set and take you to the saved Track Sets screen with a default name (figure 29). To view your track set on a map, tap the name of the saved Track Set (figure 30).
- To turn off GPS Tracking and not save your tracks, tap the “Reset Track” button after either pausing by tapping the green “Tracking On” Or “Tracks on/off” button on the bottom of the GPS screen (figure 27). The unsaved GPS Tracks will remain in memory until you tap “Save Track” or “Reset Track”.
- To rename a Track Set before uploading, tap the Edit icon next to the Track Set name.
- To delete a Track Set, tap the trash can icon next to the Track Set. To upload to the server, check the checkbox with the green checkmark (figure 29), then tap “Upload”.
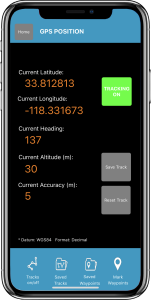 Figure 27. GPS screen |
 Figure 28. Home GPS indicator |
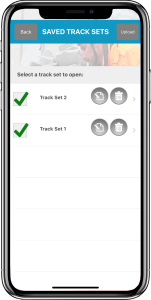 Figure 29. Saved tracks list |
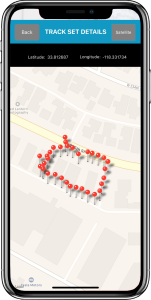 Figure 30. Tracks map |