- To save a GPS Waypoint, tap the “Mark Waypoint” button on the bottom right of the GPS screen. This will take you to a screen with various GPS Waypoints to choose from (figure 31). Select the GPS Waypoint type and a detailed screen for the GPS Waypoint type appears (figure 32). This page will auto fill with the current GPS lat/lon, as well as the type of Waypoint (and USNG for CERT/US domestic versions). There are options to add notes in the “Waypoints Notes” field, as well as attaching photos to the Waypoint.
- To add a photo to the Waypoint, tap the “Photo” button on the top of the Waypoint details screen (figure 32) or tap the empty photo icon. Once a photo is saved, tap “Save” to save your notes and/or photo, then tap “Done”.
- To add additional photos to the Waypoint, tap the “Add Another Photo” button that appears below the thumbnail of the current photo thumbnail or tap the “Photo” button again at top.
- To manage your photos saved to the Waypoint, tap the thumbnail of the photo. This will take you to the photo gallery screen, where you can delete photos by tapping the trash can icon for the photo thumbnail (figure 34b). To see a larger version of the photo, tap a photo thumbnail once to enlarge, then tap again to close. As a note, the last photo of the photo set is used as the current Waypoint photo thumbnail, but all photos in the photo gallery for the Waypoint are uploaded to the server, when you upload your Waypoints.
- To see a list of saved GPS Waypoints, tap the “Saved Waypoints” button on the bottom of the main GPS screen (figure 27). This will display a list of all saved Waypoints in your device (figure 33). To see details of a saved Waypoint, tap the desired saved Waypoint. This will display the Waypoint details like figure 32.
- To see your saved Waypoints on a map, tap the “Show on Map” button on the upper right of the “My Waypoints” screen (figure 33). Once on the map, you can tap an icon to delete via the trash can icon for it, or change the type of Waypoint by tapping the edit icon for the Waypoint, and picking a new Waypoint type (figure 34).
- To upload your saved Waypoints to the server, check the checkboxes with the green checkmark for desired Waypoints and tap the “Upload” button (figure 33).
- To delete a Waypoint, check the checkbox and tap the “Delete” button. (Important Note: if a Waypoint is currently assigned to a Sector form, you will first need to remove that Waypoint from the Sector Form it belongs to, before deleting from your list of Saved Waypoints). When finished, tap the “Done” button on the upper left of the screen you are on to return to the GPS home screen (figure 27).
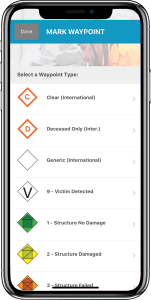 Figure 31. Waypoint select list |
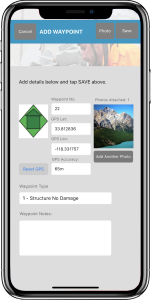 Figure 32. Add Waypoint screen |
 Figure 33. Saved waypoints list |
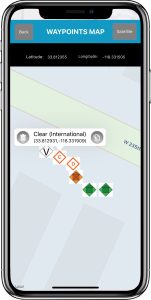 Figure 34. Waypoints map |
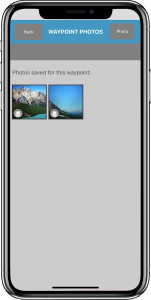 Figure 34b. Waypoint photos |